Automating Unsplash. Automating everything.
One of the principles of this blog is that laziness is a virtue. Of course, this is not a new idea – It’s been a staple of coding since at least the heyday of Perl. Up til now I’ve been focussing a lot on foundational tools, but the real fun comes when we save time and make magic happen.
So, perhaps it’s time for some applied laziness. Let’s start close to home. If you’re a blogger, then it’s likely you’ve used Unsplash to source freely usable images for your posts. It’s a fantastic resource and It’s not a massive pain to find an image, download it at three sizes, and create an attribution string (very important, this last part. We want to acknowledge talented creatives for their work, right?). On the other hand, after a few posts I began to find the process just a little tiresome. If I have to perform a tedious task more than two or three times, I’m ready to automate it.
So, let’s do it.
The project
I’m going to create a class that, given a photo id from Unsplash, downloads the related image at any arbitrary width and saves it under a given directory. It will provide a URL reference to the downloaded image suitable for including in a post along with attribution text. I’ll create a script that runs the class, and talk about how to stitch it into a richer command line script.
Creating your Unsplash developer account
In order to use an API you’ll need an account on the target service and you’ll usually need to generate some keys and/or set up a new application. You can sign up from the Unsplash Developer site. Once you’re in, follow the prompts on the Your Apps page to create a new application.
Apps have three levels – demo, production, and enterprise. If you’re intending to stitch Unsplash functionality into a Web application you’ll likely use up your request quota fast so you’ll need at least a production level app, which will require review. If your SAAS is super successful you’d need to upgrade to enterprise which will require cash. Luckily, we’re just going to build a personal productivity tool – so the rate limit of fifty requests an hour should be more than adequate for our needs, even during development.
Once you’ve created an application, you’ll be given access to the credentials an Unsplash app might need. These are: an access key and a secret key, the application name, and a callback URL that you can set yourself. All but the access key are optional for our purposes since we’re only going to require publicly accessible data with this tool. You should confirm on the application configuration screen that only the Public Access checkbox is selected – at least for this exercise.
Library or cURL?
There is no reason why we could not implement our call to the Unsplash API using PHP’s cURL extension. On the other hand, laziness is my motivation here, and Unsplash recommend a library that will do some of the lifting for us.
$ composer require unsplash/unsplash
NOTE In fact I have provided a cURL only version of the code for this article. I include a link to it at the end.
I am also going to set up autoload support for a class file I intend to create at src/apitools/UnsplashWriter.php. So, bringing it together, this is how my composer.json file shakes out:
{
    "require":  {
        "symfony/yaml": "*",
        "unsplash/unsplash": "^3.2"
    },
    "autoload": {
        "psr-4": {
            "getinstance\\utils\\": ["src/", "test"]
        }
    }
}
Initialising the library
The Unsplash PHP package provides static methods for its common operations. My class UnsplashWriter will call the HttpClient::init method in its constructor to get things started.
namespace getinstance\utils\apitools;

use Unsplash\HttpClient;
use Unsplash\Photo;

class UnsplashWriter
{
    private Photo $photo;

    public function __construct(string $photoid, string $access, string $appname)
    {
        HttpClient::init([
            'applicationId' => $access,
            'utmSource' => $appname
        ]);
        $photo = $this->switchPhoto($photoid);
    }
}
Notice that I did not bother with the secret and callback credentials. We don’t need those in public mode. We could even leave out the appname, but that would generate a warning. I call HttpClient::init() which initialises our API session for us. The UnsplashWriter constructor also requires a photo id argument, which I passes along to the switchPhoto() method.
The idea of this class is that it should always be pointing to a particular Unsplash picture. It then provides methods for acquiring the image at different sizes and for generating attribution.
The code above would not run as shown. I have not yet provided the switchPhoto() method. Let’s go ahead and do that.
Acquiring photo data
Here is my switchPhoto() method:
public function switchPhoto(string $imageid): Photo
{
    $this->photo = Photo::find($imageid);
    return $this->photo;
}
As you can see, this is pretty simple. At its heart is a call to Photo::find(). Behind the scenes this makes an HTTP request to https://api.unsplash.com/photos/:id where :id is the $imageid argument with which the switchPhoto() method was called (in this instance, from the constructor). Photo::find() returns a Unsplash\Photo object. You can see a JSON representation of the information that this object encapsulates at the endpoint documentation.
The switchPhoto() method sets the Photo object as an object property so that other functions can access the data in order acquire binaries and generate the attribution.
Now that I have photo data, I need to find a way to acquire arbitrary sized images from Unsplash.
Using photo data to construct a download URL
The photo data includes URLs which represent the image preconfigured at various sizes. If any of those sizes are acceptable, you can can simply access the URL download the image. If you need to amend the size, all is not lost. You can alter the URL to your specification and Unsplash will provide the image upon request.
Let’s create a couple of methods to alter a photo’s URL:
public function getSizedUrl(int $width): string
{
    $urlparts = $this->getUrlParts();
    $quarr = $urlparts['query_array'];
    $quarr['w'] = $width;
    $ret = "{$urlparts['scheme']}://{$urlparts['host']}{$urlparts['path']}?" . http_build_query($quarr);
    return $ret;
}

public function getUrlParts(): array
{
    $url =  $this->photo->urls['regular'];
    $urlparts = parse_url($url);
    parse_str($urlparts['query'], $qs);
    $urlparts['query_array'] = $qs;
    return $urlparts;
}
The main logic here is provided by the getSizedUrl() method. This requires a $width argument. The photo data cached by switchPhoto() includes a urls property which will contain a regular URL for a standard sized version of the image. I pass this in to the getUrlParts() method.
getUrlParts() breaks down a URL into an array. For this, it uses parse_url() to make an initial subdivision and then parse_str() to further slice the query string into a sub-array.
Then its a matter of simply altering the w parameter extracted from the query string, setting it to the given $width value, then reconstructing the array.
Writing an image
Of course, once we have a URL for an image at the right size we still need to download and save the binary. Here is writeImage():
public function writeImage(string $dir, int $width, string $sizename): string
{
    // get remote url for image
    $url = $this->getSizedUrl($width, $sizename);

    // create directory
    $date = new \DateTime("now");
    $year = $date->format("Y");
    $dir = "{$dir}/wp-content/uploads/{$year}";
    if (! file_exists($dir)) {
        mkdir($dir, 0755, true);
    }

    // work out paths and names
    $id = $this->photo->id;

    $urlparts = $this->getUrlParts();
    $ext = $urlparts['query_array']['fm'];

    $filename = "{$id}-x-{$sizename}.{$ext}";
    $urlpath = "/wp-content/uploads/{$year}";
    $newurl = "{$urlpath}/{$filename}";

    // get and write data
    $contents = file_get_contents($url);
    file_put_contents("{$dir}/{$filename}", $contents);
    return $newurl;
}
Most of this method involves basic string wrangling. It requires a top level $directory argument, a $width integer and a $sizename descriptor which will be used with the image id to build a new filename.
First, we get a URL that matches the given $width from getSizedUrl(). We create a directory within the target directory. I’m using a WordPress directory structure here – wp_content/uploads followed by the current year. That’s just because my blog uses this for historical reasons – you can obviously structure your directories any way you need.
Then, I extract the image’s extension from the url (another call to getUrlParts() – a little wasteful since I have already broken down the URL once so I might add some caching in future). I create a filename out of the extension, the photo’s id and the $sizename method argument. I construct a URL suitable for adding to an img tag or, in my case, a markdown tag or a Jekyll YAML header block.
Finally, I download the file to my newly created directory and return the URL I constructed.
NOTE I use
file_put_contents()with a remote URL for my download. That works very nicely but you do need to make sure that the allow_url_fopen php.ini directive is set for your PHP.
Creating the attribution
This is really just a matter of mining the photo data we already have and constructing a string:
public function getAttrib()
{
    $username =  $this->photo->user['username'];
    $name =  $this->photo->user['name'];
    $ret  = "*Photo by <a href=\"https://unsplash.com/@{$username}?utm_source=unsplash&";
    $ret .= "utm_medium=referral&utm_content=creditCopyText\">{$name}</a> on ";
    $ret .= "<a href=\"https://unsplash.com/?utm_source=unsplash&utm_medium=referral&";
    $ret .= "utm_content=creditCopyText\">Unsplash</a>*";
    return $ret;
}

public function getPhoto(): Photo
{
    return $this->photo;
}

public function getDescription(): string
{
    return $this->photo->description ?? $this->photo->id;
}
I’ve thrown in a couple of other useful methods too. getDescription() returns a description if one was provided by the uploader. Otherwise it falls back on the id field which is guaranteed to be present.
The getPhoto() method uh.. gets the photo data.
Calling the UnsplashWriter class
First, let’s find an image we like. A kite might be nice – it’s a grey day here in the UK so I’d like to see some blue sky and primary colours. I run a search for “kite”.

I find one I like and click on it. The browser’s location bar gives me the id I need.
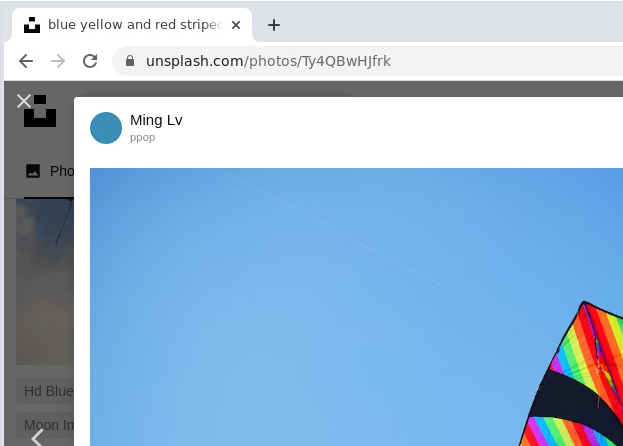
Now that I have the id I can create a super simple script to call the UnsplashWriter class.
require_once(__DIR__ . "/vendor/autoload.php");
use getinstance\utils\apitools\UnsplashWriter;
$access = "xxxx";
$appname = "getinstance-blog-autopic";
$blogdir = "./output";
$writer = new UnsplashWriter("Ty4QBwHJfrk", $access, $appname);
$url = $writer->writeImage($blogdir, 400, "titchy");
print "";
print "\n\n\n";
print $writer->getAttrib() . "\n";
This script simply gathers together the required configuration details, instantiates an UnsplashWriter class, and writes a version of the image with a width of 400 pixels. Finally it prints a markdown image tag and an attribution.
Let’s run it:
$ php scripts/simplecall.php
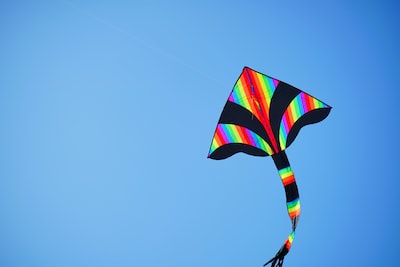
*Photo by <a href="https://unsplash.com/@ppop?utm_source=unsplash&utm_medium=referral&utm_content=creditCopyText">Ming Lv</a> on <a href="https://unsplash.com/?utm_source=unsplash&utm_medium=referral&utm_content=creditCopyText">Unsplash</a>*
Now, I’ll embed that output here:

So, there we have it. With a little more finessing, I can automate my blog image downloads and attribution very easily. Of course it would be nice to create a script that does not require editing every time it is run. Let’s think about that a little.
Creating a configurable command line script
The trouble with a more polished script is that it will require at least some boilerplate code for checking arguments, parsing flags, reading configuration files and so on. I have covered most of that already in a previous article.
Still, here is GitHub Gist for a handy Hello World CLI script that can be used as a template. Also, the source code for this article includes a command line implementation. Most of the functionality in place there was covered in the command line scripting article. Additionally, though, the script provides support for a JSON configuration file named gitools.json with this structure:
{
    "unsplash": {
        "access": "xxxxxxx",
        "secret": "yyyyyyy",
        "callback": "http://test.com/callback",
        "appname": "getinstance-article-app"
    }
}
Rather than look for the configuration values at the top level of the data structure the script expects an unsplash object. This leaves us the option of using the configuration file to support multiple services later if we choose.
The script allows you to pass it the location of the JSON file, or it searches across range of directories starting with the current working directory and ending with /etc.
A cURL version of the UnsplashWriter class
One final Easter egg. Throughout this example, I have been using the official Unsplash PHP library for my call to the API. However, for a public realm application, the API authentication requirements are pretty straightforward.
You really only need to add a client_id HTTP Authorization header along with your access key. You can even just provide client_id=xxxx as a query string argument. Here is an extract from a cURL version of the UnsplashWriter class that does away with a library requirement:
class UnsplashWriterCurl
{
    private object $photo;
    private string $host = "https://api.unsplash.com";

    // ...

    public function get(string $endpoint, array $args = []): string
    {
        $url = $this->host . $endpoint;

        if (count($args)) {
            $qs = http_build_query($args);
            $url .= "?{$qs}";
        }

        $ch = curl_init();
        curl_setopt($ch, CURLOPT_URL, $url);
        curl_setopt($ch, CURLOPT_RETURNTRANSFER, true);

        $headers = array(
           "Accept: application/json",
           "Accept-Version: v1",
           "Authorization: Client-ID {$this->access}",
        );

        curl_setopt($ch, CURLOPT_HTTPHEADER, $headers);

        $output = curl_exec($ch);
        $info = curl_getinfo($ch);
        if ($info['http_code'] != 200) {
            throw new \Exception("GET error for: $url: $output");
        }
        curl_close($ch);

        return json_decode($output);
    }

    public function switchPhoto(string $imageid): object
    {
        $this->photo = $this->get("/photos/{$imageid}");
        return $this->photo;
    }

// ...

}
You can find the full cURL version of the UnsplashWriter class in this article’s source at GitHub.
Conclusion
There’s much more you can do with the Unsplash API, of course. If you’re looking to provide access to images through a Web application you can find the full documentation at the Unsplash site.
You can find source code for all my recent articles on GitHub. The code for this article is in the 008_unsplash-blog directory.